Your Guide to Prepping Your Home for Professional Painting
- By Admin
- •
- 13 Jun, 2019
- •

Whether you just bought a new house and need to add some color or you're wanting to update your current home, a professional paint job helps your property look its best. By choosing an expert to paint your home's interior, you ensure your house looks the way you want without taking time out of your busy schedule to complete the project.
Before your painters show up with those perfect colors, take the following steps to prepare your house so they can complete the job quickly and easily.
1. Ask Your Painter for Advice
Before you take down those family photos, ask your painter if they have any recommendations for preparing your home for their arrival. They may have specific requirements so they can work most effectively.
2. Take Down Internal Decorations
Pictures and decorations prevent your painters from coloring your walls completely. Before your painting team arrives, take down all internal decorations and any hardware used to keep them in place. Pack everything into boxes (labeled with the items inside and which room they're from) and store them in your basement, attic, or garage.
3. Remove Switch and Electrical Covers
Your electrical outlet and light switch covers also present an obstacle for your painting crew. Use a small flathead screwdriver to remove the plates over your outlets and switches. Place these covers in a drawer or with other items you've moved out of the way.
You can also insert plastic outlet covers (like the kind you'd use to childproof outlets) for an added layer of protection. If any paint drips onto the outlet, it'll land on the easily removable — and disposable — plastic piece.
4. Cover Furniture, Rugs, and Exposed Flooring
You've likely spent a decent amount on furniture, rugs, and other accents to complete your home's look. Unfortunately, paint can drip onto those items and ruin them.
If your painter asks you to remove all furniture, rugs, or mats from the painting space, do it. Otherwise, cover your furniture with canvas or plastic sheets. Roll up rugs and floor mats and store them so they don't accidentally get paint on them during the process. You'll also want to lay tarp or plastic over the exposed flooring in the painting areas.
Before you buy any protective materials, though, ask your crew if they provide covers to place over furniture and floors.
5. Tidy Up
Prepare each room in your home that will be painted so the walls are ready for priming and painting. Wipe down your walls and vacuum crown molding and baseboards. Vacuum, sweep, and mop floors to eliminate dust and hair that could stick to wet paint.
If your walls need a deeper clean, mix a few teaspoons of gentle soap with a gallon of water and scrub down your walls with the solution. Dry the walls with a microfiber cloth to avoid leaving fibers behind.
6. Designate Space for the Work Crew
You may not want your painting crew to access certain areas of your home while they're working. When your team arrives, tell them which restroom you'd like them use, where they can take breaks, and which areas of the home are restricted.
You should also set aside a room or section of your house as the crew's staging area. Here, they'll store all their equipment and supplies so the task is less intrusive on your day-to-day schedule.
Your home is one of the biggest investments you'll make in your life, so any changes you make to it should add to your property value. Professional painting services from The Paint Doctor help you do just that while saving you time and money and letting you enjoy an updated look without experiencing any of the stress of doing it on your own.
Your home is more than just a place to live – it's an expression of who you are, a personal canvas that you share with the world. And just like any masterpiece, the beauty is in the details. That's where we come in. Here at The Paint Doctor, our mission is to elevate your home's exterior to an artwork. This all starts with a meticulous preparation process, the cornerstone of a successful, long-lasting finish.
Starting with a Blank Slate: Site Assessment
Before we even unscrew the lid from the first paint can, our team initiates the process with a comprehensive site assessment. This initial step is crucial in identifying any potential issues that could impact the painting process. From signs of wood rot, loose or damaged siding to surface irregularities, we conduct a thorough examination of your home's exterior. By understanding the canvas we're working with, we can tailor our approach to your home's unique needs.
Creating the Ideal Canvas: Power Washing
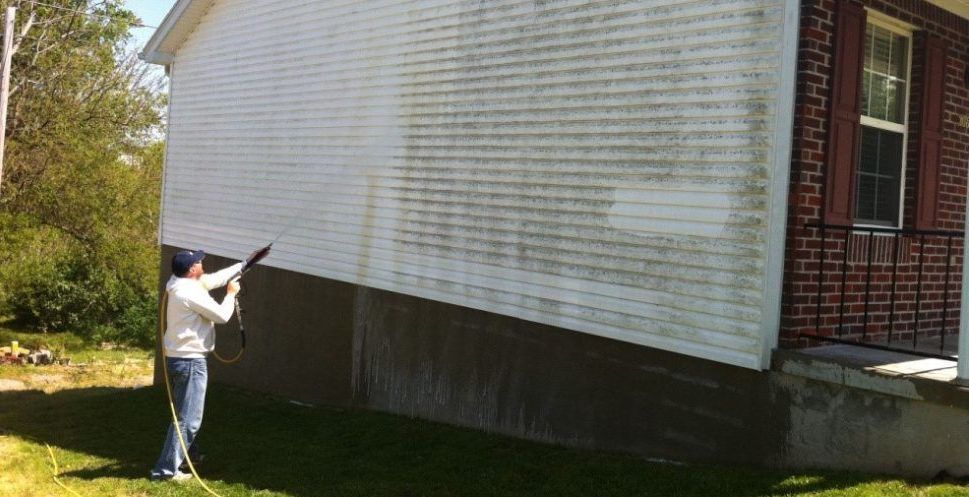
Over time, the exterior of a house can accumulate layers of dirt, dust, mold, and mildew – elements that obstruct the adhesion of paint to the surface. To combat this, we use power washing as a means to purify your home’s exterior. Utilizing eco-friendly cleaning agents, we effectively eradicate these impurities without causing damage to your landscaping or the environment.
Smoothening the Surface: Surface Preparation
The next phase involves addressing the issues identified during the site assessment. This could encompass everything from scraping away loose or peeling paint, repairing damaged siding or trim, sanding rough areas, and addressing any wood rot. Every repair is made meticulously to match your home's existing exterior seamlessly.
Sealing the Surface: Caulking
Caulking is a step that extends beyond just the life of your paint job - it's essential for protecting and insulating your home. Our team applies SherMax lifetime warranty caulk, ensuring 90% dynamic movement for joints. We focus on caulking windows, doors, and facades, thereby preventing water ingress, insect infiltration, and even condensation build-up.
Laying the Foundation: Priming
Priming, often overlooked in DIY projects, is pivotal to ensure a uniform and smooth paint job. We apply a high-quality primer, creating an ideal surface for the paint to adhere to, enhancing the durability and vibrancy of color.
Ensuring Precision: Masking and Protection
To ensure a clean, precise paint job, we meticulously mask off areas that won't be painted, such as windows, doors, light fixtures, and landscaping. By spreading drop cloths, we ensure your property remains protected from any potential paint splatters.
The Final Check: Inspection and Touch-Ups
As a final step before the painting commences, our team performs a detailed inspection. We comb through your property, ensuring no spot has been missed during the preparation process. Only when everything is perfect, do we open the first can of paint.
The meticulous preparation process we adhere to at The Paint Doctor may take a little extra time, but we believe it's absolutely worth it. The result? A flawless, long-lasting paint job that doesn't just enhance the beauty of your home but preserves it for years to come. We're not just about doing the job – we're about doing it right the first time, and we’re proud to put our expertise to work for you. Contact us today to start your journey of transforming your home's exterior.
The Benefits of Hiring a Professional House Painter vs. DIY Painting
Painting the interior or exterior of your home is a great way to improve its overall look and increase its value. However, before embarking on any painting project, one must decide whether to do it themselves or hire a professional house painter. While DIY painting can be tempting, there are several benefits to hiring a professional house painter that cannot be overlooked.
1. Expertise and Experience
Professional painters have the necessary skills, expertise, and experience to deliver a high-quality job. They know which paint and tools to use for each specific job and how to get the best results. Additionally, they have a good understanding of color combinations, trends, and styles that can transform the look of your home.
2. Time-Saving
Painting can be time-consuming, especially if you have a large area to cover. Professional house painters work efficiently and quickly to complete the job in a timely manner without compromising on the quality of work. This will save you time and allow you to focus on other important activities.
3. Cost-Effective
Hiring a professional house painter may seem more expensive initially, but it can save you money in the long run. Professional painters know how to use paint efficiently, so you won't waste money on unnecessary paint. Additionally, they have their equipment and tools, so you won't have to worry about renting or buying them.
4. Convenience
Painting can be messy and disruptive to your daily routine. Professional painters take care of everything from prepping the surface, painting, and cleaning up, so you can relax and enjoy your time. Additionally, they work around your schedule to ensure minimal disruption to your routine.
5. Quality Workmanship
Professional house painters take pride in their work and aim to provide the highest quality of workmanship. They use the best quality paint and tools to ensure that the finished job is of high quality and will last for years.
In conclusion, hiring a professional house painter has numerous benefits, from saving time and money to quality workmanship and convenience. When looking for a professional painter, it is important to choose someone with the necessary credentials, experience, and expertise to ensure a successful project.

Considering how many areas of the home require maintenance, proper deck maintenance can be challenging for many homeowners. Thankfully, help is available. This guide and your contractor will help you learn the signs that your deck is in distress and requires maintenance.
1. Cracked, Split Deck Boards
Wood is not meant to last forever, so knowing the early signs that the wood is in distress is smart. Cracked and splitting wood is one of the first signs of a deck that is in distress.
In most cases, the cracking and splitting of a few deck boards stems from basic pressure and wear and tear over time. Exposure to the elements can also cause this damage. Therefore, if your wood deck has not been stained and protected with wood sealant and stain, boards may start to crack or split sooner than normal.
You don’t necessarily need to replace the whole deck, especially if you only find a few boards that are starting to crack and split. Repairing the damaged boards is possible depending on the size of the cracks.
For small cracks that measure less than 4 inches long, consider filling the cracks with latex wood filler specifically designed for outdoor use. For larger cracks, you’ll want to replace the damaged boards.
2. Rotting Wood
Your wood deck may also rot, which not only affects its look, but also its structural integrity. If you notice any signs of rot, repairs are imperative.
Excess moisture, which can occur from heavy rain, sleet, and snow, for example, can affect both treated and untreated wood can be affected by this excess moisture.
Dry rot is also a problem many deck owners face. Caused by a fungus, dry rot can spread quickly through your entire deck. Also, dry rot is appealing to termites and carpenter ants, so your deck may also be at risk of a pest infestation.
Signs of rotting including visible decay of the wood, but also soft, hollow areas that not only develop on the floorboards and stairs, but also the wood posts, spindles, and railings. Dry rot can also turn wood brown, gray, or black in color.
You need to replace rotted wood, but you also need to determine the cause of the rot to protect the new wood in the future. Sealing the new wood with a water-resistant sealant will help prevent further moisture damage and the potential growth of fungus.
3. Aging Finish
Finally, if the finish of your deck is showing signs of age, some maintenance is required. Application of new stain is not only important for improving the deck's look, but also for protecting the underlying wood. Stain will add color to the wood while sealant protects the stain AND the actual wood's quality, reducing the risk of cracks and decay.
Experts recommend applying a new coat of transparent stain every year. For solid stains, apply a new coat every 5 years. For the absolute best protection against the elements, seal your deck's surface twice a year.
In addition to general maintenance, such as pressure washing, updates and repairs to your deck will be necessary. For assistance with your deck, contact The Paint Doctor today.


